The “Unhackable” WordPress Blog – Finding Security In the Static
Using the word “unhackable” is generally considered a bad ideaTM due to this being a largely unobtainable feat with software. In this post I attempt to get as close to “unhackable” as possible with my own personal blog (the one you’re reading right now). I have designed the process in such a way that it could be applied to any CMS (such as a corporate drupal site, for example). The main idea being that you can take a super vulnerable site and compile it into a static set of files for viewing.
WordPress Is Just Too Vulnerable
One of the major motivators for this effort is the question I’ve been asked a few times:
Why do you use WordPress? Aren’t you worried about getting hacked?
The reason I use WordPress is simple, it’s a great platform for blogging with a solid editor, a plethora of plugins, and a solid support community. However, it’s a terrible platform when it comes to running a service that you want to be secure. WordPress vulnerabilities are seemingly constant and usually occur in the plugins (usually coded by amateur PHP programmers with no background in security) but there have been quite a few issues in the core platform itself. Suffice to say if I’m not constantly updating my WordPress installation I’m bound to get owned by a script kiddie with the latest public vulnerability. Not to mention this blog has the word hacker plastered across the banner so I might as well walk around with a large “Please Hack Me” sign taped to my back.
Using WordPress Without Exposing It
Despite it being insecure I still wanted to use it for publishing blog posts, after all the platform isn’t half bad and it’d be hard to switch to something like Jekyll without breaking all my previous URLs and potentially losing SEO. However it definitely can’t be exposed to the Internet where it could be exploited. The solution I came to was to move my WordPress blog off-line and mirror it to the public Internet via Amazon’s S3 service. The process for publishing posts looks something like this:
- Write the post on a local Ubuntu virtual machine and publish it to a locally installed WordPress blog running on localhost.
- Use the command line tool httrack to clone the website into a set of flat HTML, CSS, and image files.
- Run any final command line tools to modify HTML files, in my case I wrote a tool to add subresource integrity (SRI) to the blog’s external stylesheets and script links.
- Use s3cmd to push these flat files to an S3 bucket.
- Use a combination of Amazon S3, and Cloudflare to serve the website both quickly and securely.
The reason for all of this is to remove any dynamic functionality from the website. When you have a “flat” site you minimize the surface area that can be exploited by an attacker. Really there isn’t any reason that the blog has to have an admin panel, comments, etc. All the end user should interact with is published posts.
The Final Product
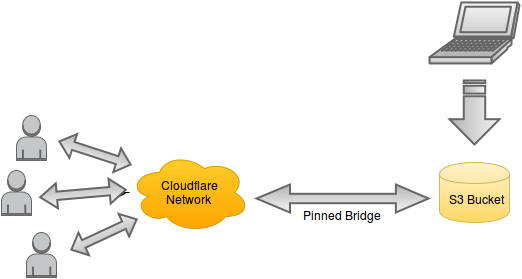
This is the final layout that we are shooting for. We’ll use Amazon S3 to store our static site which is created by running the command line tool httrack against our local WordPress blog. We’ll use Cloudflare to add SSL and to prevent malicious attackers from attempting to use up enough S3 bandwidth to make it too costly to run a site. In order to prevent attackers getting around Clouflare via discovering our bucket name, we’ll force our S3 bucket to only be accessed via IPs originating from Cloudflare’s network.
The Technical Details
Skip this section if you don’t plan on applying this process to your own CMS.
Please note, this section assumes that you’ve migrated your WordPress blog, Drupal, or other CMS into a local VM.
Once you’ve set up your website on your local VM, you now need to configure it for cloning.
First, we need to modify our hosts file so we can edit/use the blog as if it was on our regular domain (in this case we’ll use this blog’s domain):
sudo echo "127.0.0.1   thehackerblog.com" > /etc/hosts
sudo echo "127.0.0.1   www.thehackerblog.com" > /etc/hosts
Now that we’ve done this, thehackerblog.com will resolve to our own local webserver that we’ve setup. Now you can navigate to your domain and use it like you would your regular CMS.
Now that we’ve taken our site local we need to setup our cloud services so that we can push our content somewhere. First, let’s start off by creating an S3 bucket to store out static site on.
- Sign in to the Amazon Web Services console at https://aws.amazon.com/console/
- Under the list of presented cloud services, choose “S3″ under “Storage & Content Delivery”
- Click “Create Bucket”
- Choose a bucket name that is the same as your domain, e.g. “example.com” (you will see why shortly) and click “Create”.
- Click the magnifying glass icon next to the newly created bucket from the menu on the left.
- Select “Static Website Hosting” and click “Enable website hosting”. Specify the index document as index.html and specify the error document as index.html as well.
- Save the endpoint URI listed under this menu.
Now that we have a new bucket, let’s go through the process of flattening our WordPress blog and uploading the static content to S3. On the local VM with your CMS, install the command line tool httrack and use it to clone the site:
sudo apt-get install httrack
httrack "thehackerblog.com" -O "flattened_website/" "+*.thehackerblog.com/*" -v --urlhack="https://==//" --urlhack="http://==//" --disable-security-limits
The above httrack syntax specifies that we want to clone “thehackerblog.com”, store the static files in flattened_website/ and rewrite all http and https URL(s) into relative protocol links (//). We’ve also disabled the security limits to speed up the cloning process as all of the network calls are happening to our local webserver.
Now that we’ve cloned our website into static resources, let’s dump it into our bucket. To do so we’ll use the command line tool s3cmd which can be installed with the following command:
sudo apt-get install s3cmd
Before we can use s3cmd with our bucket we must first configure it. We’ll need to get some AWS access keys, to do so perform the following steps:
- Navigate to the following link: https://console.aws.amazon.com/iam/home
- Click on “Users” in the side panel.
- Click the blue “Create New Users” button
- Enter in a user name and click “Create”
- Click on “Show User Security Credentials” and copy down the “Access Key ID” and “Secret Access Key”.
You can now use these keys with s3cmd, to configure s3cmd with these keys use the following:
s3cmd --configure
Inside of the flattened_website/ you created earlier you will see a directory with the same name as your website, navigate to this folder. We will now use s3cmd to upload these flat files to the bucket with the following syntax:
s3cmd --delete-removed sync flattened_website/thehackerblog.com/* s3://your_s3_bucket_name/
Great, now your files are uploaded to S3 – but you’ll notice that when you go to view them you get an “Access Denied” message. This is because by default all objects in Amazon’s S3 buckets are not viewable publicly. We need to define a proper Access Control List (ACL) using policies. In our case we are going to pin our S3 bucket so that only Cloudflare IP ranges can access our data. This prevents attackers from connecting directly to our bucket in order to continually download large files to force us to pay high bandwidth bills in AWS. To save you the trouble of creating your own S3 policy, you can use the following which is pre-populated with Cloudflare’s IP ranges:
{
	"Version": "2015-10-17",
	"Id": "S3 Cloudflare Only",
	"Statement": [
		{
			"Sid": "IPAllow",
			"Effect": "Allow",
			"Principal": {
				"AWS": "*"
			},
			"Action": "s3:*",
			"Resource": "arn:aws:s3:::thehackerblog.com/*",
			"Condition": {
				"IpAddress": {
					"aws:SourceIp": [
						"197.234.240.0/22",
						"103.21.244.0/22",
						"198.41.128.0/17",
						"190.93.240.0/20",
						"141.101.64.0/18",
						"188.114.96.0/20",
						"103.31.4.0/22",
						"104.16.0.0/12",
						"173.245.48.0/20",
						"103.22.200.0/22",
						"108.162.192.0/18",
						"199.27.128.0/21",
						"162.158.0.0/15",
						"172.64.0.0/13"
					]
				}
			}
		}
	]
}
Now that we have Cloudflare’s IP ranges whitelisted, let’s setup our Cloudflare account with our website. To do this, follow Cloudflare’s (fairly easy) setup process by pointing your NS records to Cloudflare’s generated nameservers. In order to setup Cloudflare with your bucket you need only a single CNAME record pointing to the S3 subdomain that you recorded earlier (you did do that right?). Here is a screenshot of that setup for this website:

If you’ve done everything correctly (and the DNS has propagated) you should now be all set up! Since your bucket name is the same as your website domain, your requests will already be routed to the appropriate bucket. This is because S3 routes requests based off of the HTTP Host header, and if a single domain name is present it will route to a bucket with that name.
Due to this setup you now are free from ever worrying about fun web vulnerabilities such as:
- Cross-site Request Forgery (no functionality to forge)
- Cross-site Scripting (limited impact, as there is not functionality or sessions – content spoofing still possible but basically harmless)
- SQL Injection (no DB)
- The latest 0day in WordPress, Drupal, or whatever the CMS you’re now hosting locally.
What this doesn’t prevent:
- Some hacking team breaking in to your Amazon or domain provider account and changing your DNS.
Which brings us to the next section…
Domains and DNS
One treasure trove of danger that I stumbled upon was in my domain management. Before the audit, my domain resided on a domain registrar called GoDaddy (yes, I know). Even worse, apparently upon registering the domain I opted into domain privacy which populated my WHOIS information with the contact information for DomainsByProxy. The more I looked into this domain privacy service the more I cringed at this being the company who essentially “owns” my domain. Keep in mind that the WHOIS information is law so if you’re going to use a domain privacy service you have to trust them. To make a long story short I didn’t have any idea what my DBP account password or account number was so I had to call GoDaddy about it. Apparently you are supposed to receive an email from DBP upon activating domain privacy with GoDaddy (didn’t happen, forum posts of other users confirm that many are in the same boat). This DBP service is apparently not the same company as GoDaddy but both accounts share the same password somehow. So I had to figure out what my GoDaddy password was at the time that I purchased the domain. Did I mention that it’s one giant ASP app?
To make a long story short, if this is the state of GoDaddy/DomainsByProxy I don’t want to know how other services operate.
At this point though I’m left with a dilemma. I don’t want to run my own registrar service so I have to hedge my bets on one that I believe to be secure software-wise and resilient to social engineering. Perhaps I’m biased but I have a large amount of respect for the security that Google offers for its services so I decided one using Google Domains to host the domain. Just going with a security-conscious company is not enough however, we need to also maximize the security of these accounts as well!
Locking Down Every Account
One big portion of this is ensuring that each account related to this domain name is properly secured from compromise. When it comes to third party providers you can only hedge your bets with companies you trust to be secure and stable (in my case I chose Amazon and Google). However when it comes to account security you can take some strong steps to prevent them from being hacked. Aside from having strong randomly-generated passwords, enabling two-factor authentication (2FA) is a huge win security wise. To enable two factor on Amazon Web Services and your Google account, follow these resources:
Final Conclusions
We’ve now successfully secured our website from many of the common web security vulnerabilities. While there are some attacks that are out of our hands such as zerodays in Amazon or Google, Social Engineering attacks, or being beaten with a five dollar wrench until you give up your password, we have reasonable protection against hacking groups and non nation-state attackers. Due to XSS attacks not being particularly effective in this setup I have not yet setup Content-Security-Policy, but additional security enhancements such as this should be easy to implement since the final product contains no dynamic functionality. I encourage readers of this post to attempt to hack this site and (if you’re extra nice) report them to me so I can add the additional security steps to this post.
Until next time,
-mandatory